

DIY instructions for Painting Your Kitchen Cabinets
Posted on September 14, 2021


 Repainting your outdated kitchen cabinets can give them a fresh and modern look. While it’s tempting to rush through the process, taking the time to follow the steps below will help ensure that your cabinets will look professionally painted. Here is the process we follow when we paint kitchen cabinets. Where possible, we’ve specified to the exact products our professional painters use for our customers.
If you get stuck, contact us at [email protected]. We’re happy to lend some advice to DIYers!
 Step-by-step instructions for painting kitchen cabinets:
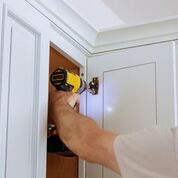
- Remove doors and hardware. If you’ll be replacing the hardware with new handles and hinges, spackle the old hardware holes shut, or better yet, choose new hardware with the same “footprint” so you don’t have to spackle up the holes left by the old hardware.
- To re-install them easier, number the cabinets so you can replace them in the same place.
- Sand cabinets and spackle smooth finish – you don’t have to sand off the all old paint, just make the surface smooth.
- Wipe down cabinets with a slightly damp cloth and let dry thoroughly.
- Vacuum and remove all sand and dust you’ve created in your work area so this dust doesn’t accidentally stick to the paint later on.
- If the cabinets have a previous finish, use a BONDING primer as a first coat.
- Use 2-3 coats of Sherwin-Williams Proclassic Enamel paint since it’ll dry to a smoother and harder finish than other paints.
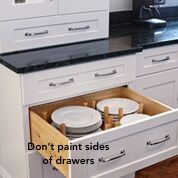
- DON’T paint the inside of the drawers where the “wheels” are located, or they’ll stick.
- Allow adequate time to dry between coats and before using your kitchen again.
- Use a thin nap roller to get a smooth finish.
- Experiment with the whole process on one, out-of-the-way cabinet door as your first try.
- Store a small mason jar of touch-up paint right in your kitchen. Re-painted cabinets may chip and having touch-up paint handy will make touch-ups easier down the line.
- Before reinstalling and/or opening and closing the doors, ensure you allow the paint to cure for a week or two. This will help increase the durability of the paint. You may still find that you need to touch up the paint occasionally since the paint you’re applying is not a factory finish.
 Most importantly, relax and don’t rush the process. Your repainted cabinets will hang in your kitchen for years to come, so it makes sense to take your time while prepping and painting them. When our professional painters paint a kitchen full of cabinets, it’s often a week-long project that entails prepping, painting, drying and reinstallation time. If it takes you, a do-it-yourselfer, 2-3 weeks to complete the whole project, you’re likely right on track.
The top 12 mistakes people make when painting their kitchen cabinets themselves:
- You have unrealistic expectations of the outcome – if you are DIYing this project it’s likely that some of your cabinets aren’t going to be perfect.
- You don’t clean the cabinets before painting them – you must get rid of grease and dirt so the paint sticks.
- You rush. Take it very slowly and assume this will take three weekends to complete.
- You try to paint the cabinets without removing the doors, handles and drawers.
- You don’t label each door and drawer – this needs to be done so you can put each element back in the exact same place.
- You don’t sand the cabinets so the paint will stick.
- You don’t raise cabinets off the floor which causes you to miss edges and corners.
- You don’t prime the cabinets with a bonding primer.
- You choose the wrong color of paint. Sample lots of colors to ensure a perfect match with your other furnishings and appliances. There are dozens of whites, and all look completely different in your kitchen’s unique lighting.
- You paint the front of the cabinet before the back – if you paint the back first and smudge it, at least the imperfection will be on the inside of the cabinet door.
- You don’t use the correct type of paint – you need durable paint – see our recommendations above.
- You reinstall the cabinets before they are completely dried and cured. Wait two weeks before reinstalling doors so you can minimize chipping.
< BACK TO OUR INDEX OF ARTICLES, TIPS, AND ADVICE
You also may like to read:
Hiring CertaPro to paint your kitchen cabinets
Using CertaPro’s free color consultant – time well spent getting the color just right
Popular paint colors in the Boston area (updated 2x/year)
A day-by-day journal of a kitchen cabinet painting project
