
Painting Your Staircase | CertaPro Painters is Here To Help!
Posted on December 1, 2024


4 Key Takeaways of this article:
Staircases Are High-Traffic Zones – Use durable, scuff-resistant paint on treads and banisters to withstand constant wear, dirt, and body oils.
Glossy vs. Matte Finishes Matter – Glossy banisters are trendy and easy to clean but show scratches. Matte hides paint hides flaws but does not have as much pizazz.
Painting Order is Key – Start with spindles, then banisters, risers, and finally treads, painting every other step to keep stairs usable during painting.
There are DIY hacks you can use to make the job easier – Use a tinted primer, a foam roller, plastic wrap for spindles, and Frog Brand Tape for crisp lines and a professional finish.
Because staircases are such focal points, painting banisters and railings is one of the most effective ways to refresh your home’s interior. Let’s walk you through the considerations:

Painting a staircase, banisters, and railings is not like painting regular interior trim:
Staircases are high-traffic zones – your shoes, socks, and kids’ toys will put your staircase to the test!
- Keep durability in mind when painting your staircase because the banister and treads of a staircase are likely the most touched surfaces in your home.
- Because it is so highly trafficked, your staircase should also be painted as a focal point.
- Because they are touched so frequently, banisters need to be cleaned thoroughly before painting in order for the new paint to adhere well.
- You’ll also want to remember that painting a banister railing a light color will show collected dirt more than one painted a light color.
- Consider a germ-resistant paint like Sherwin Williams’ Superpaint for banisters in commercial settings (especially healthcare or daycare-type environments. Microbicidal paints (Sherwin Williams’ Paint Shield is another good choice) kill most germs and keep killing them for a few years after you paint. This can help cut down on constant cleaning, painting, and spreading germs.
Dark vs. light paint colors or stains on the treads – Pros and Cons
- The treads (the part you step on) take constant wear and tear, so using durable, scuff-resistant paint is essential. Look for high-quality enamel or floor paint designed for heavy foot traffic.
- Scuffs and shoe marks are more hidden on treads that are painted or stained a dark color.
- But, because dirt and dust tend to be light in color, to keep a darkly stained stair tread looking clean, you will have to vacuum more often than if you painted it a light color.
- A low luster (matte/flat) finish on the treads hides dust and dirt and is less slippery.

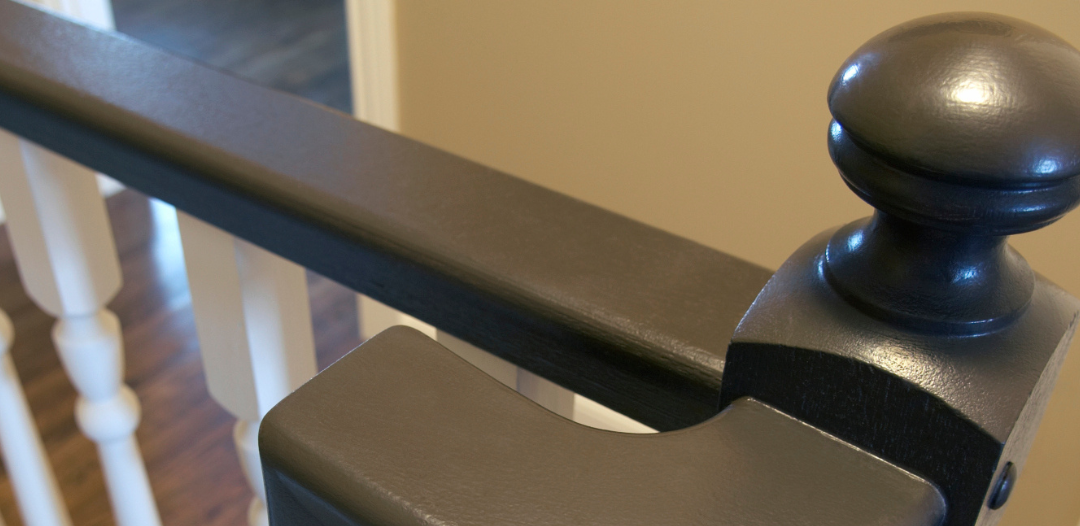
Glossy finishes on the banisters:
- A glossy finish highlights imperfections on a banister railing but is easier to clean.
- It is now very “on trend” to paint banisters a glossy black – it looks great and is easy to clean. However, scratches and chips will be much more noticeable on a shiny surface.
- A matte finish hides flaws (scratches, etc.) but is more challenging to clean. A matte finish will hide scratches better than a glossy one.
Our exact paint and stain recommendations for your staircase:
- For the risers and spindles, we most often use a white semi-gloss like Benjamin Moore Regal Select or Cashmere. For a streak-free look, Benjamin Moore Advanced works well.
- For the treads and rails, we use a porch and floor paint. For the first coat, use a tinted primer with the same color as the final coat.
- For glossy banisters, we like Benjamin Moore Advanced Paint.
Tips for Painting Your Staircase – making it easier for DIYers.
Use a Tinted Primer to Reduce Coats
- If painting a dark color over a light surface (or vice versa), use a tinted primer similar to your final color. This reduces the number of coats needed.
Paint Every Other Step to Keep Stairs Usable
- If you’re painting the treads, do every other step so you can still use the staircase while the paint dries. Once the first set is dry, paint the remaining steps.
Use a Foam Roller for a Smooth Finish
- A foam roller (rather than a brush) gives a streak-free, professional-looking finish on banisters and railings.
Use a sock to get into the nooks and crannies of intricate spindles
- This YouTube video shows you just how easy it is to paint the first coat of spindles with a sock.
- Subsequent coats can be handled with a tiny foam roller or brush.
Seal with a Clear Coat for Extra Durability
- If painting the treads, apply a clear polyurethane sealer over the paint to prevent scuffs and prolong the finish.
Use a Putty Knife to seal the painter’s tape.
- To get crisp, clean lines where the risers meet the treads, press down on your painter’s tape with a putty knife to prevent paint from seeping under.
- Skip the blue tape; DIYers should use Green Frog Tape, and you will be stunned at the crisp lines you get.
Wrap Spindles in Plastic Wrap Instead of Taping
- If you’re painting spindles or railings, wrapping them in plastic wrap instead can save time and ensure complete coverage without paint bleeding onto other areas.
- Often, if you’re installing new spindles, they come wrapped in plastic that you can easily tape down (see YouTube video below).
- At the top and bottom of each spindle, the plastic lay straight, but you will also have a bit of banister on an angle that will need covering where the spindle hits the banister. This YouTube video shows you how to handle that angle easily.
In what order do I paint my staircase?
To get a professional, long-lasting result, here’s our advice on painting order:
- Spindles (Balusters) – It takes time to paint spindles, so it’s best to start here to avoid drips on freshly painted surfaces. Spindles are the most time-consuming parts of a staircase painting project.
- Banister (Handrail) – After the spindles, move on to the banister so that any accidental drips from this step land on unpainted areas.
- Risers (Vertical Section of Steps) – Since risers don’t take much foot traffic, you can paint them before the treads.
- Treads (Horizontal Step Surface) – These should be painted or stained last, and it’s best to paint every other step first so the stairs remain usable during the drying process.
Sand Between Coats for a Flawless Finish
- For ultra-smooth results, lightly sand between coats using 220-grit sandpaper to remove any imperfections before applying the next layer.
- Be sure to wipe the dust with a damp cloth afterward before applying the next coat of paint or stain. Let the surface dry before applying the next coat.
Match the Style of Your Staircase to Your Home
- Consider the architectural style of your home when selecting colors.
- A classic colonial home looks great with a crisp white banister and dark wood treads. A glossy black banister is also appropriate in a classic home.
- A modern home can pull off bold colors or two-tone designs.
Should a DIYer tackle painting a staircase or hire a professional painter?
- If you’re dealing with a complicated staircase, intricate spindles, or a multi-story stairwell, hiring a professional painter might save you time and frustration.
- If you have patience and time, DIYing is fine. Be prepared to do a lot of intricate taping, prep, and painting, and have the patience to do that. Think of it as a multi-day project where you can really take your time on each section to end up with professional-looking results.
- Plan on about 25 “person hours” to paint a staircase. This means if one person completed the work, it would take about 25 hours. And if two people tackled the project, it would take about half that time (12.5 hours each).
- The spindles will take you the longest and should be done with no time pressure and a lot of care.
Cleaning the stairs after they’re painted:
- Dragging a vacuum up a staircase is no fun and clumsy.
- It’s faster and much easier to use a damp rag to wipe them down. Try a mop with a wet microfiber rag at the end. Toss the rag in the wash after you’re done. Easy!
Need help or have questions about your staircase project? Contact us today for a free consultation!
