
Update your wood paneled rooms with these makeover options
Posted on December 28, 2020


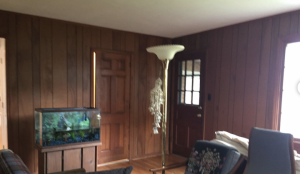
Do you have a room in your home with wood paneling that’s looking dated? You aren’t alone, wood paneling comes in a number of forms but it’s not something you see included in most new homes. The reason is that it’s dark, it’s a solid wall of wood grain, and it makes a room look small, cave-like, and maybe a bit too rustic.
Before there was sheetrock or drywall there was plaster over wooden lathe and also wood paneling. The earliest wood paneling was made from individual boards usually 6-8 inches wide and often with a bit of detail routered into them like a small half-round detail. They were made to interlock and were a quick and easy way to cover the walls inside your house.
The original versions of wood paneling were called shiplap (a fairly wide board) and wainscoting (narrower boards with more detail). You can still see wainscoting in homes today, usually, from the floor trim up to about the height of a chair rail and capped with a bit of square trim.
In many early applications, these boards were simply stained or varnished so that their wood grain showed through, alternately people painted them. At some point, the raw wood look evolved into large panels that were basically faux shiplap with vertical seams. As a wall covering it was an inexpensive way to cover the walls in a basement or addition that wasn’t supposed to be the most formal room in the house. Once it was nailed up you were done, it required no taping, no spackling, no priming, and no painting. Was it good-looking? It was good enough for where it was used. Was it the lowest cost way to finish a basement? Without question.
Pair that paneled “finished basement” with a hung tile ceiling and some shag carpet and you have every “rumpus room” in Rochester from 1960-1975. The only question today is “what do we do with it?”
There are a whole lot of options but we are going to focus just on the four main ones that most people choose – here they are below:
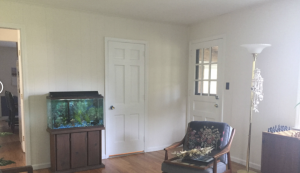
Option #1 – Remove the wood paneling
Sounds good right? It would come right off the walls easily but now you are staring at bare studs. The next move would be to sheetrock, tape, spackle, prime, paint and then add the trim. Basically, it’s the same amount of work as refinishing the whole room, it’s also about the same cost. One thing you might consider is removing it from the top half of the wall and keeping the lower half. You could drywall the top and tie them together with a chair rail and finish the paneling using one of the options below. You might want to first make sure the paneling is thick enough to match the drywall you would be using so that adding the chair rail would be done over two surfaces that butt together evenly.
Options #2 – Whitewash the paneling
This is a great way to lighten the look of the paneling but it’s going to depend on the kind of paneling you have. Some sheet paneling is more of a finished veneer over some substrate than it is actual “wood paneling”. This means that the first step is to determine if it’s even possible.
The benefit is that you can dramatically lighten the look and even keep the woodgrain details if that is what you are after. Lighter wood finishes give you more flexibility when it comes to decorating a room and it also makes the room look bigger.
The first step is going to be sanding to both knock the darker finish off and give you a clean surface the “whitewash” can bond to. When we say “whitewash” we aren’t talking about actual antique whitewash but paint mixed with water so that it goes on in a semi-transparent way. It likely will involve applying the watered-down paint and wiping it off so it acts more like a stain.
You also don’t have to use white; you could use a watered-down shade of almost any color from yellow to blue to even light grey and anything in between. The result will be unique, interesting, and still highlight the wood grain and knots in the boards or panels.
Option #3 – Turn it into a drywall-looking wall and paint it.
This option is a bit more labor-intensive than the last one because it’s going to involve spackling the surface after sanding it. You are going to want to fill in every last crack and gap, every void around a knothole, etc. The objective will be to get it as smooth as a traditional sheetrock wall.
After the prep work, you would prime and paint like normal making sure that you get good coverage. You are likely looking at painting the wall in two coats to ensure you have a uniform finish but once it’s all prepped your color options are the same as any other wall or room in your house.
Option #4 – keep the texture and detail and just paint right over it.
 This option has a number of advantages. Starting with the prep you might just need to thoroughly wash the surface and/or give it a good scuffing with sandpaper to create a more adhesive surface. The biggest advantage is the texture itself. If there are joints, channels, knots, dings, etc. these all become a texture that can never be simulated with drywall. The light will play differently off the surface, depending on the surface you can also use any finish from flat to high-gloss. With the right color, the results can really be amazing.
Suddenly your paneling goes from being a defect to being a unique feature. The real trick here is one of being able to visualize it finished instead of as it currently exists. It also is conducive to bold color choices like dark blue or black, solid yellow, light green, red, etc.
If you find yourself unsure as to what to do with your paneled room why not talk to an expert? At CertaPro Painters® of West Rochester, NY We’ve really seen and done it all when it comes to interior painting. We can help you determine the best way forward for your paneled room, whether it’s replacement, whitewashing, making it look like a normal wall, or painting it with its texture intact.
Give us a call at 585-200-5007 or schedule an estimate online here. We are more than happy to help you find the perfect solution and take your “rumpus room” from the ’70s into the 2020s.
